Island Batik Shop Hop February 2025
- kimberlysquilts
- Feb 24
- 5 min read
I am so excited to be an Island Batik Ambassador, but I am feeling the pressure! There are so many talented and creative Ambassadors I am feeling intimidated, but I can do this (or at least I hope I can!)
For my first project I was assigned a tool from Deb Tucker Studio 180 design. (Huge thank you to Deb for generously supporting us!). As a former Certified Instructor for Studio 180 Design I am feeling like I can handle this one and it is a good place to ease into this! My tool is the Diamond Rec tool. I got this! I am now feeling more confident. I LOVE this tool.

So I have the tool identified now it is time for the fabric! Thank you Island Batik for being so generous in sharing the Whispering Woods line of fabric designed by the amazing Jerry Khiev Whispering Woods - Lumin Fabrics. I said I love earth tones and this bundle did not disappoint!

Now the search is on ..... what do I make to give this line of fabric the justice it deserves and and also showcase all that the Diamond Rec tool can do. I have some ideas. I want to make something that will showcase the secondary designs and illusions of curves that the Diamond Rec makes look so easy. The only real guideline is it needs to be a table runner or bed runner. I am starting to feel a little more confident! Let me get to this.
First things first - determine the block I will make and what fabrics will I use ...

Can I just say I love the entire line of Studio 180 Design tools. She is a math genius the way all of her tools have the perfect 1/4" seam so you don't loose any of your points when you put two blocks together. And let's not forget how all of the tools work so well together so you can use multiple tools in one project to create interesting secondary designs and optical illusions of curves but with all straight seams! Just wait you will see! All of her tools as well as videos on how to use them can be found here - Deb Tucker's Studio 180 Design.

Look at these colors! I selected all of the high contrast fabrics in the line to ensure that both the primary block as well as the secondary design will show through. I am winging this design so I wanted to minimize poor contrast between the background and the accent colors. I am trying to plan ahead as much as I can while I know I am winging some of this - but hey - sometimes winging it is a good thing :)
Time to let the piecing begin!


I found that laying the blocks out in the same layout that they are going to be stitched really helps to make sure they are stitched in the right orientation. I "may" have stitched the same piece on wrong more than once. That's okay! It gave me a chance to get really good at the piecing part.
Now it is time to press everything so I have nice crisp seams before I start trimming everything down. The mini Oliso iron was the perfect size for pressing all of the components. It was also the ideal size to have right beside my machine when stitching. Check out the entire line of products here - SMART IRONS – oliso
Now it is time to use the Diamond Rec tool to do my trimming


Look at how when you line the X placement lines on your points, the final trim down leaves the perfect 1/4 inch for your seam allowance. Thank you Deb for taking all the math out of it and leaving me with perfect points every time.

Now for the coolest part...... Deb's tools allow you to SLIGHTLY oversize your block so you have forgiveness in your piecing because you then trim them down to the PERFECT size with very little waste! This little pile of trimings is ALL of the "waste" for the entire project!! YES I said ALL of the project. Before I was introduced to her tools I wasted much more fabric than this in all the blocks I had to trash because they came out how do I put it ....... less than square..... yeah that's it - less than square! No wasted blocks with her tools and very little scraps!

Time to start laying out the components to make my blocks and then put the blocks together to create my secondary design and optical illusion of curves.
In addition to the Diamond Rec tool, I did utilize the Square Squared tool for my center unit and the corner pop for the square corner units. Once pieced, the accent fabrics "should" line up to look like curves. Oh the amazement of these tools when you combine them. Have I said yet how much I love her tools?

It is starting to take shape. I can start to see it come to life! Just a few more blocks and it will be the perfect width for my guest room bed!

Stitching
Stitching
Stitching

Presssing Pressing and more Pressing
Nicely pressed blocks sure make the trimming easier! This mini iron from Oliso was perfect to use right at my machine.

Ooops ... Math isn't my strong suit so I am glad Deb took the math out the the piecing because it was hard enough for me to know how many blocks I needed :)
I was a few blocks short so a little more piecing and trimming.PERFECT!!! Now we are ready to put the rest of the bed runner together! I am so excited that this is coming together. The pressure is real!!!!

Ta-Da ..... perfect fit across the foot of the bed! Now just to get it on the longarm and get it bound before my company is here this weekend! It is for their bed afterall :).

Getting started. Longarm is loaded and I al loving this Hobbs batting! Perfect loft using this 80/20.
Ditch work is complete so now just the "filling". I am so close! Did I mention how much I love these tools and how perfect they make my imperfect piecing look?

Binding
Binding
Binding
The end is in sight and I am pleased with how it came together considering I had no pattern!
Binding is my least favorite step in the process. I wonder if that is because it means my project is coming to an end?

so close!
AND HERE IT IS!!


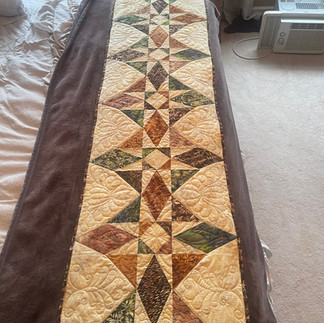


I am feeling so accomplished and ready to take on March's challenge. Starting this project I felt so much pressure to make something worthy of the company of such talented Ambassadors that Island Batik has, and I hope this does the team, the Island Batick fabrics, and the amazing Studio 180 Design Tools Justice!
Be sure to check out all the other Ambassadors creative projects
Brenda Alburl ~ Songbird Designs
Renee Atkinson ~ Pink Tulip Quilting
Susan Deshensky ~ Lady Blue Quilts Studio
Tina Dillard – Quilting Affection Designs
Brittany Fisher ~ Bobbin with Brittany
Kimberly Flannagan – Kimberlys Quilts
Preeti Harris ~ Sew Preeti Quilts
Mania Hatziioannidi ~ Mania for quilts
Connie Kauffman ~ Kauffman Designs
Connie Kresin Campbell ~ Freemotion by the River
Emily Leachman ~ The Darling Dogwood
Denise Looney ~ A Quiltery
Leah Malasky ~ Quilted Delights
Susan Michaels – Dragonfly Fibertart Pattern Company
Lisa Pickering ~ Lisa’s Quilting Passion
Sarah Pitcher ~ Pitcher’s Boutique
Gail Sheppard ~ Quilting Gail
Carol Stanek ~ Stitch with Color
Solomae Stoycoff – Cuddle Cat Quiltworks
Jennifer Thomas ~ Curlicue Creations
Suzy Webster ~ Websterquilt
Make sure you check out the Island Batik monthly voting to select your favorite project for the month and have a chance to win a generous prize from Island Batik.
See you next month!


Kimberly, your runner is awesome! The fabrics look so pretty in this design.
Beautiful runner--great work!!
Wow! Beautiful work! I adore the quilting
Beautiful runner Kimberly! I think I need to add the Diamond Rects tool to my toolbox!
Hello Kimberly! You did a great job. Your runner is so lovely in those fabrics. I love quilts that have the illusion of curves with all straight piecing. Awesome!